Waiting List
This guide offers a comprehensive exploration of the ‘Waiting List’ functionality integrated within Bookified. This handy feature lets customers join a waiting list when all appointment slots are taken. As soon as a slot becomes available, the customer is informed and their appointment is scheduled.
Enable Waiting List
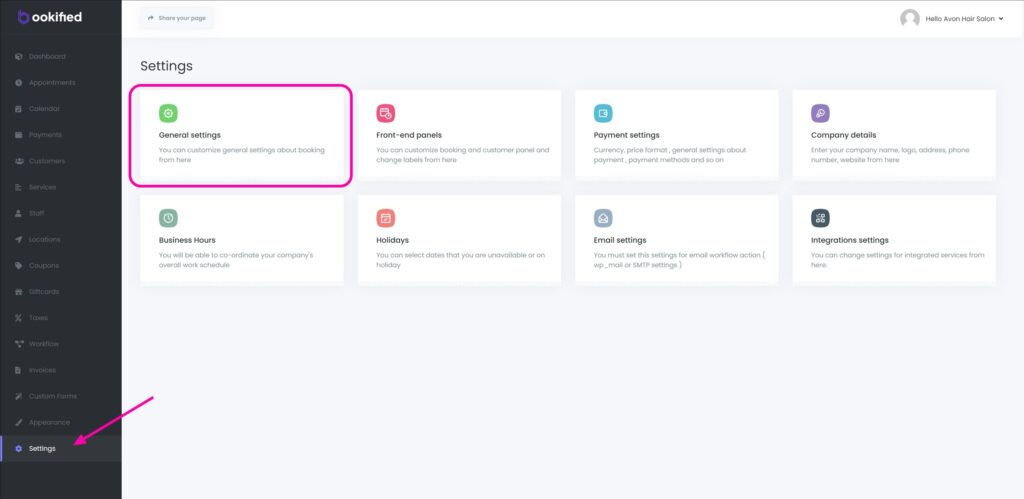
1. Navigate to the ‘Settings‘ menu.
2. Select ‘General Settings‘
3. Select ‘Waiting List‘, then select ‘Enabled‘
4. Select ‘Save Changes‘
Troubleshooting: Waiting List Displays a Message Despite Being Enabled
- If you receive the following message, please ensure to enable or disable the required steps. Otherwise, the waitlist will not activate, even if it’s enabled.
Waiting List will not be initialized until following requirements will be met
- Location step should be visible or selected and ordered before Date Time step.
- Service step should be visible or selected and ordered before Date Time step.
- Staff step should be visible or selected and ordered before Date Time step.
- Any Staff option should be disabled.
- Navigate to ‘Front-end Panels’, then to ‘Booking Steps’. Ensure that the ‘Location’, ‘Service’, and ‘Staff’ steps are enabled and are ordered before the ‘Date & Time’ step. Also, within the ‘Staff’ step, ensure that the ‘Any Staff’ option is disabled.
How Waiting List Works
- After enabling the ‘Waiting List‘ feature, the already booked timeslots will start to show on the ‘Booking Panel‘ and customers will have an opportunity to join a waitlist by booking these timeslots.
1. The customer sees that the time slot is busy, indicated by a ‘!’ and a message: “The timeslot is busy. You can join the waiting list.”
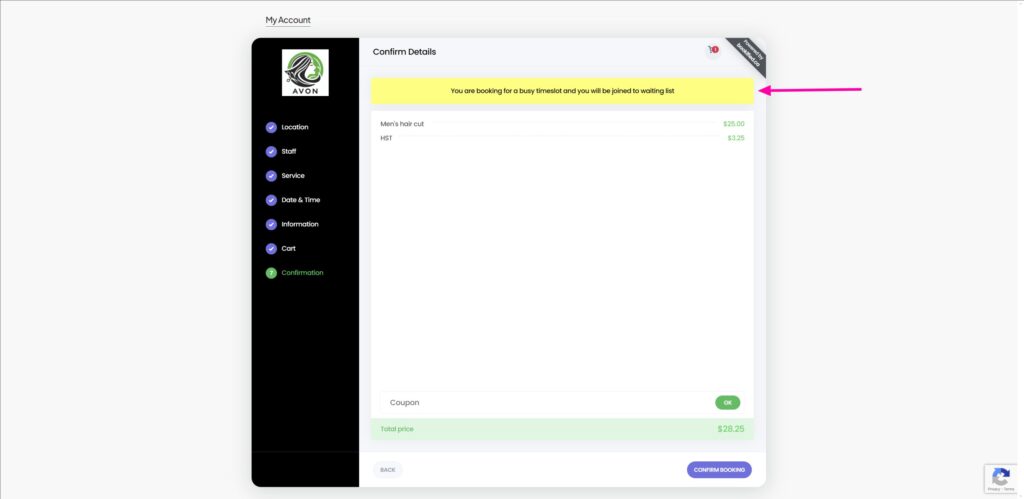
2. The customer selects that booking block and proceeds to finalize the booking.
Customer is now on the Waiting List
- Once a customer finalizes the booking, they will appear on your ‘Appointments‘ list, as shown in the image below.
Alerting Staff: Waiting List Time Slot Now Available
- We now need to create a ‘Workflow’ to alert staff members when a time slot on the waiting list becomes available. This event will be triggered when a previously booked time slot is released due to customers cancelling their appointments. We can do this via two ways, ‘Email‘ or ‘SMS‘ notification.
Email Notification Guide
1. Select ‘+Create New Workflow‘ and create a name for your workflow.
2. Within ‘When This Happens‘, select ‘Timeslot is available‘.
3. Within ‘Do This‘, select ‘Send Email‘
4. Click on ‘CREATE‘ on the bottom right.
After creating the workflow, a new screen will be displayed for further setup
1. Within the ‘When’ field, you will see ‘Timeslot is available’, and next to it, an edit button. Clicking this button will reveal various filters to refine the process. For instance, you can customize this workflow to apply only to a specific location, staff member, or service.
2. Within the ‘Do this‘ field, you will see ‘Send Email‘, and next to it, a setup button. Please select the setup button.
3. For the ‘To‘ field, please select ‘Staff Email‘.
4. For the ‘Subject’ field and the ‘Message’ field, go ahead and customize them as you see fit. By clicking on the ‘Purple Tag’ icon in the ‘Subject’ field, you’ll be shown relevant short codes that the system will automatically fill in. Similarly, clicking on ‘Keywords’ within the ‘Body’ field will also display relevant short codes for automatic system input.
5. Select ‘SAVE‘. (The ‘SAVE & TEST’ option allows you to send a test email to a specified email address.)
Please watch the video below for a complete example of all the steps
This is the template we used:
Dear {staff_name},
A timeslot has opened for {appointment_start_date_time}.
SMS Notification Guide
1. Select ‘+Create New Workflow‘ and create a name for your workflow.
2. Within ‘When This Happens‘, select ‘Timeslot is available‘.
3. Within ‘Do This‘, select ‘Send SMS message via Twilio‘
4. Click on ‘CREATE‘ on the bottom right.
After creating the workflow, a new screen will be displayed for further setup
1. Within the ‘When’ field, you will see ‘Timeslot is available’, and next to it, an edit button. Clicking this button will reveal various filters to refine the process. For instance, you can customize this workflow to apply only to a specific location, staff member, or service.
2. Within the ‘Do this‘ field, you will see ‘Send SMS message via Twilio‘, and next to it, a setup button. Please select the setup button.
3. For the ‘To‘ field, choose ‘Staff‘, ‘Location‘, or ‘Company‘ phone number.
4. For the ‘Message’ field, go ahead and customize this as you see fit. By clicking on the ‘Purple Tag’ icon in the ‘Message’ field, you’ll be shown relevant short codes that the system will automatically fill in.
5. Select ‘SAVE‘. (The ‘SAVE & TEST’ option will allow you to send a test SMS to a number of your choice.)
Please watch the video below for a complete example of all the steps
This is the template we used:
Dear {staff_name},
A timeslot has opened for {appointment_start_date_time}.
Allocating Approved Slot to a Waiting List Customer
- Currently, the allocation of approved slots must be done manually. However, we are developing an automated system.
1. Navigate to the ‘Appointments‘ menu to see a complete list of all appointments.
2. Decide which customer you would like to offer the open slot to, click on the three dots adjacent to the customer, and select ‘Edit’. Now, you need to change the customer’s status from ‘Waiting’ to ‘Approved’. Make sure to leave ‘Run workflows on save’ checked so the customer can be notified of the appointment.
3. Select ‘Save‘
Please watch the video below for a complete example of all the steps


